This is a brief explanation of the technique without entering the technical aspects of it, I’ll be just talking on pratical experiences here. Sometimes when I’m asked which macro lens I use, the person gets surprised when I answer none. Macro can be a very cheap kind of photography, it can be done without actually needing to expend hundreds on a true macro lens. For reference, I was able to find the main lens I use for reversing (Soligor 28-35) for less than U$20, that’s cheaper than a good close-up filter or branded extension tubes.
What I use to achieve magnification are various alternatives methods, and I’m not against macro lenses but I simply never owned one, and think I should invest in other fields I’m lacking more at the moment, like a better telephoto. But even the native magnification of just 1:1 in macro lenses (except the MPE-65) never caught much my attention, as before moving to a DSLR I was already used to get past that on compact cameras with close-up filters.
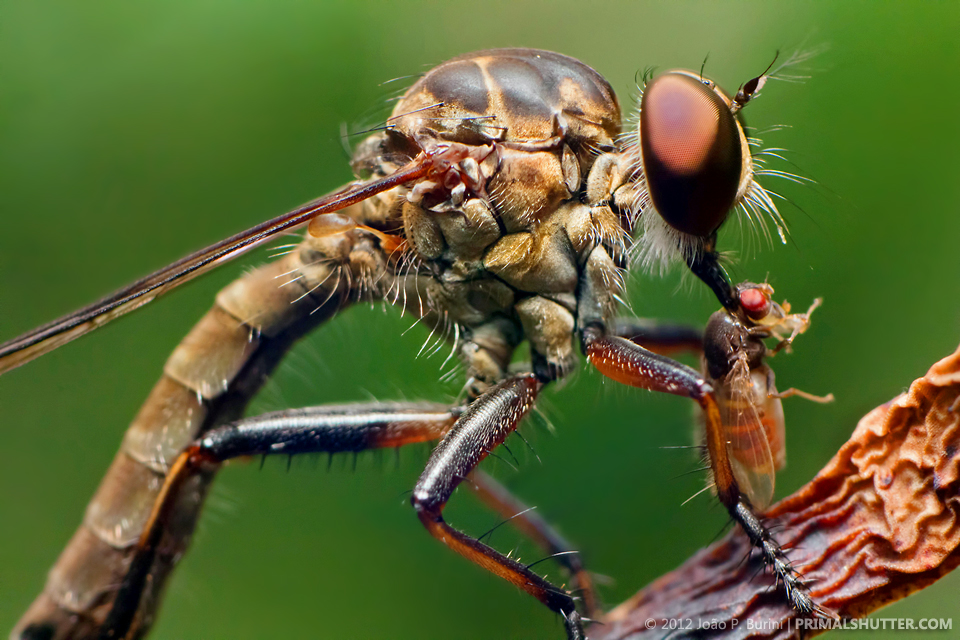
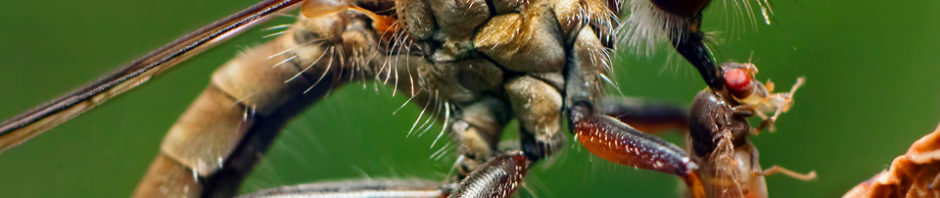
Robberfly (Asilidae) with prey
ISO1600 | 1/200 | f/11 @ 28mm reversed
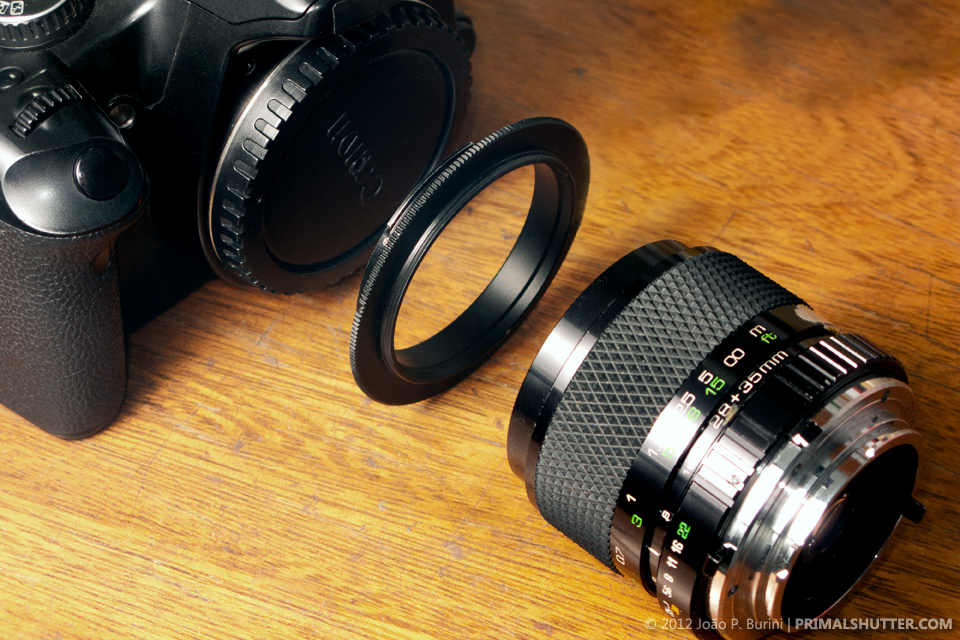
Now one of my favorites means of achieving high magnification is reversing a wide angle lens, for this a simple metal ring is needed as an adapter, which has one side threaded for screwing in the front of the lens like if it was a filter, and the other side of the ring has the camera mount like the back of a lens. Without a reversal ring you can even play with any lens just by holding it backwards in front of the camera mount, only to see the magnification effect it gives. These rings can be found for less than U$10, and there are also ones with the two sides threaded, to mount one lens facing another instead of reversing on the camera. By reversing one in front of another, the second lens will act as if it was a close-up filter, but the way of reversing I have experience with is mounting directly on the camera.
The resulting magnification you get with this will be dependant on the focal length of the chosen lens, the lower, higher the magnification (a 28mm will get things bigger than a 50mm). It seems like reversing a 50mm and then putting a set of tubes behind it is the choice of most, I like however going straight to wider lenghts which excludes the need for tubes unless I want to reach a really big magnification.
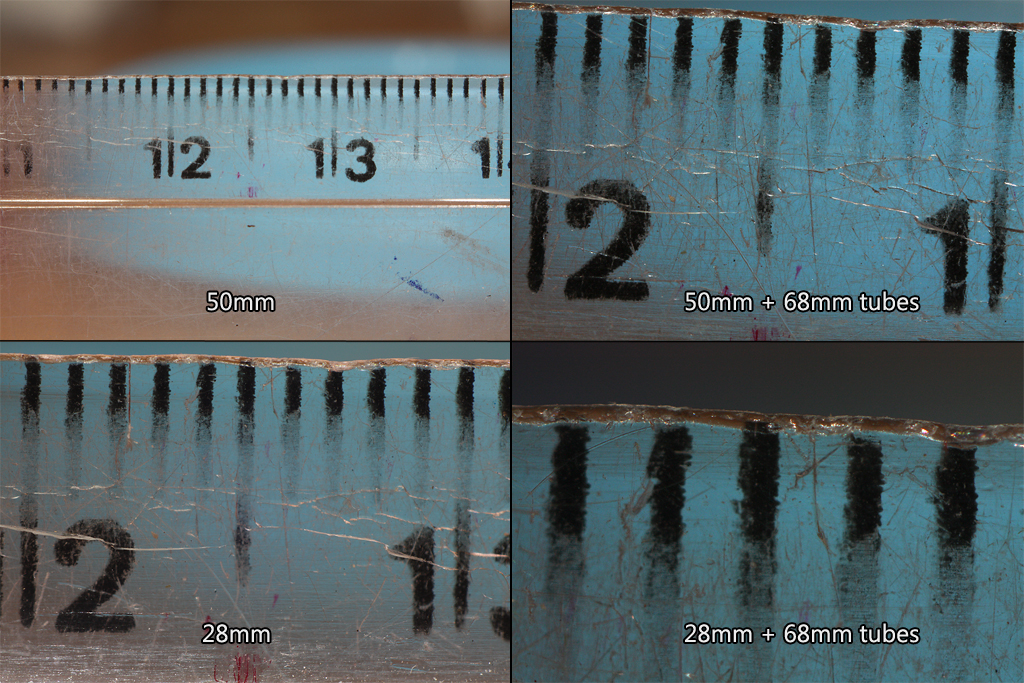
Below is a quick comparision I made with four combinations on a Soligor 28-35mm and a Canon 50mm 1.8, keep in mind these are not the only focal lengths useable or the “best” of them, but simply the ones I chose to compare, also the ruler is in centimeters, not inches.
|
Focal length reversed |
Working distance |
Magnification (APS-C) |
|
50mm |
10,5cm |
1:1.3 “Child’s play” |
|
28mm |
5cm |
1.8:1 |
|
50mm + 68mm ET |
5cm |
2:1 |
|
28mm + 68mm ET |
4cm |
4:1 “I’ll show you true power” |
The 28mm is what I use most of the time, it has practically the same the same magnification as the 50mm paired with a full set of tubes, but also consider that in both images using tubes the exposure had to be compensated by a lot of light loss. The increased focal length of the 50mm also results in more shake than the 28mm, and as I usually shoot holding the camera with only one hand (and the flash on the other), I find lesser focal lengths to work better for me again in this aspect.
The lens reversing rings offers no electrical contacts so as expected you have no control over the lens through the camera, this is why it’s preferable to use old manual lenses for this purpose, they feature the aperture control ring on the barrel itself, and don’t require access from the camera to change it when needed, also, old manual lenses are cheap nowadays and it won’t be a problem finding one.
For Canon users there is a trick to use modern lenses reversed with any aperture, which consists of first setting it on the F number you want with the lens mounted on camera, and then proceed to remove the lens whilst having the DOF preview button pressed, this way you can remove the lens mantaining the aperture you have preset, instead of having it sitting wide open.
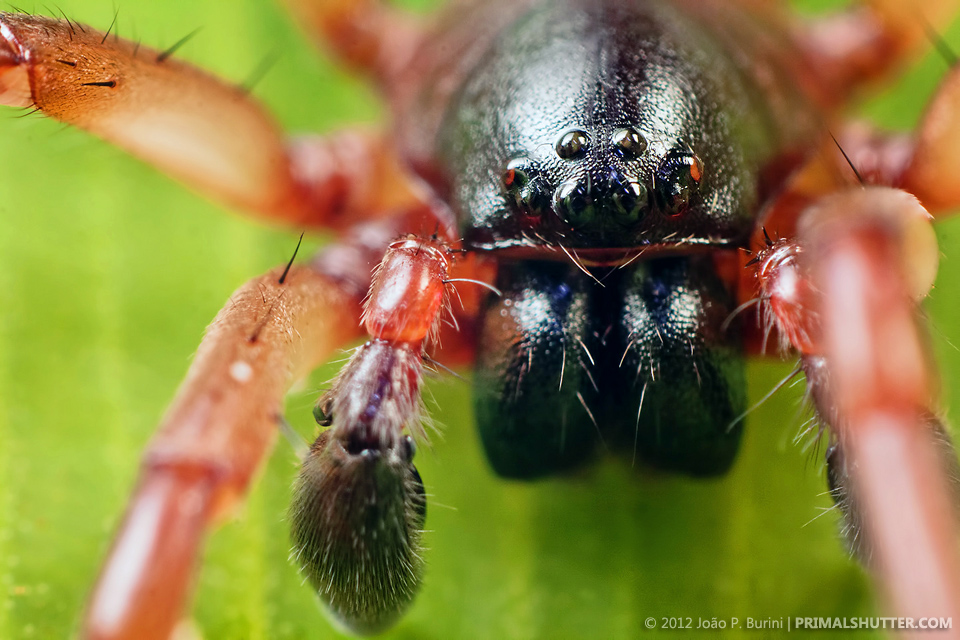 Portrait of a corinnid spider
ISO400 | 1/200 | f/11 @ 28mm reversed
The cons? With a reverse lens there is no AF, which is really not a problem at all when you are at macro, even with a true macro lens you would want to be manual focusing at 1:1. The close working distance might be a problem to lighting if you want natural lighting, for pictures with flash I consider it an advantage, the closer the easier to diffuse, and I do consider the flash a necessity for me. The distance never worried me regarding scarying bugs away (and I hear a lot of rant on working distance), I find 5cm good enough for the great majority of critters.
A real problem I find with lens reversal is getting a dark viewfinder because of the permanently stopped down lens. I take most of my macro pictures at night, at first you might think it makes the dark viewfinder issue even worst, but I find that by shooting at night I actually have some advantage in this regard because of two things: first my eye will already be a bit used to the darkness when I look down the viewfinder, as oposed to be in the bright sunlight then suddenly forced to see through a dark lens, and second and more importantly, at night I will always be using at least one flashlight and always a headlamp, which can be directed to help on the subject. Overall, during the day it’s still usable unless under a very dense shade.
So, why not just extension tubes or a close-up filter? I use them as well, but each in their own situation, usually it’s a choice made on magnification needed, and the amount of equipment I plan to walk with. Also reversing is the most fitting option on a small budget, being an old lens + reversing ring cheaper than a good close-up or tubes with electrical contacts, I consider lens reversing as cheap as it gets.
I’ll end this with a link to my pictures tagged with “reverse” on Flickr to show more results that can be achieved with it: http://www.flickr.com/search/?q=reverse&w=95419048%40N00&s=int
Excellent article! In the Macro-Photography Forum within http://www.UglyHedgeHog.com , am going to post a link to this page.
I use the technique and it works wonders. So inexepensive with super high quality.
Couple of samples from my flickr:
http://www.flickr.com/photos/45517597@N07/7157262828/
http://www.flickr.com/photos/45517597@N07/7670944356/
Thank you for the inspiring article! Your Flickr examples are truly amazing and beautiful. It seems to me that the reversed lens is only one part of the formula, however. I would love to know what sort of a LIGHTING or FLASH arrangement you are using to achieve those results. Thank you in advance for any reply and for the inspirational article.
Sorry for taking long to answer, the lighting changes a lot between shots, the robberfly one was shot with a Nissin di466 on camera diffused through a bounce card, the spider was with a Cy-20 to right of the camera with a bracket, and the Nissin handheld as a slave on the left (both diffused again)